Logic Layer
1.Introduction
The logic layer of the mini program development framework uses the JavaScript engine to provide the mini program with a running environment for developing JavaScript code and the unique functions of the Luffa Cloud mini program.
The logic layer processes the data and sends it to the view layer, while receiving event feedback from the view layer.
All the code written by the developer will eventually be packaged into a JavaScript file and run when the mini program is started until the mini program is destroyed. This behavior is similar to SeviceWorker so the logic layer is also called App Service
Based on JavaScript, we have added some functions to facilitate the development of mini programs:
- Add App and Page methods to perform Program registration and Page registration
- Add getApp and getCurrentPages methods to get the App instance and current page stack respectively.
- Provide rich API, such as getting geographic location, scanning and other unique capabilities.
- Provide modular capabilities, each page has an independent scope.
TIP
The logic layer of the mini program framework does not run in the browser, so some JavaScript capabilities in the web cannot be used, such as window, document, etc.
2.Register mini program
Each mini program needs to call the App(Object) method in app.js to register the mini program instance, bind life cycle callback functions, error monitoring and page non-existence monitoring functions, etc.
For detailed parameter meanings and usage, please refer to App
// app.js
App({
  onLaunch (options) {
    // Do something initial when launch.
  },
  onShow (options) {
    // Do something when show.
  },
  onHide () {
    // Do something when hide.
  },
  onError (msg) {
    console.log(msg)
  },
  globalData: 'I am global data'
})
The entire mini program has only one App instance, which is shared by all pages. Developers can use the getApp method to obtain the globally unique App instance, obtain data on the App or call functions registered by developers on the App.
// xxx.js
const appInstance = getApp()
console.log(appInstance.globalData) // I am global data
3.Register page
For each page in the mini program, it needs to be registered in the js file corresponding to the page, specifying the initial data, life cycle callback, event handling function, etc. of the page.
3.1Register page using Page constructor
Simple pages can be constructed using Page(Object).
Code example:
// index.js
Page({
  data: {
    text: "This is page data."
  },
  onLoad: function(options) {
    // Do some initialize when page load.
  },
  onReady: function() {
    // Do something when page ready.
  },
  onShow: function() {
    // Do something when page show.
  },
  onHide: function() {
    // Do something when page hide.
  },
  onUnload: function() {
    // Do something when page close.
  },
  onPullDownRefresh: function() {
    // Do something when pull down.
  },
  onReachBottom: function() {
    // Do something when page reach bottom.
  },
  onShareAppMessage: function () {
    // return custom share data when user share.
  },
  onPageScroll: function() {
    // Do something when page scroll
  },
  onResize: function() {
    // Do something when page resize
  },
  onTabItemTap(item) {
    console.log(item.index)
    console.log(item.pagePath)
    console.log(item.text)
  },
  // Event handler.
  viewTap: function() {
    this.setData({
      text: 'Set some data for updating view.'
    }, function() {
      // this is setData callback
    })
  },
  customData: {
    hi: 'MINA'
  }
})
For detailed parameter meanings and usage, please refer to Page
3.2Use the Component constructor to construct the page
Page constructor is suitable for simple pages, but for complex pages, Page constructor may not be easy to use.
At this point, you can use the Component constructor to construct the page. The main difference of the Component constructor is that the method needs to be placed in methods: { }.
Code example:
Component({
  data: {
    text: "This is page data."
  },
  methods: {
    onLoad: function(options) {
      // Executed when the page is created
    }, onPullDownRefresh: function() { // Execute on page creation.
    onPullDownRefresh: function() {
      // onPullDownRefresh: function() { // On page creation }, onPullDownRefresh: function()
    }, onPullDownRefresh.
    // Event response function
    viewTap: function() {
      // ...
    }
  }
})
This creation method is very similar to Custom Components, and you can use advanced features such as behaviors like custom components.
For details, please read Component constructor
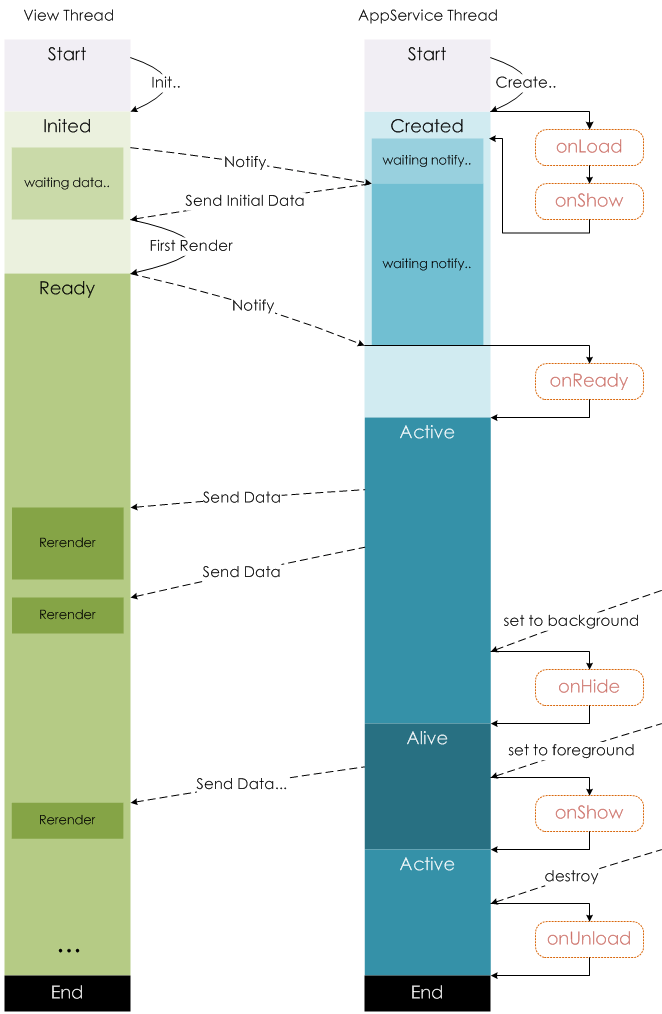
4.Page life cycle
The following figure illustrates the life cycle of page Page instance:
5.Page routing
In the applet, the routing of all pages is managed by the framework.
5.1Page stack
The framework maintains all current pages in the form of a stack. When the route switch occurs, the performance of the page stack is as follows:
Developers can use the getCurrentPages() function to get the current page stack, which is given in the order of the stack in the form of an array, with the first element being the home page and the last element being the current page.
TIP
- Do not try to modify the page stack, which will cause routing and page status errors
- Do not call getCurrentPages() during App.onLaunch, when page has not been generated.
5.2Routing method
The triggering method and page life cycle functions for routing are as follows:
The corresponding life cycle of Tab switching (A and B pages are Tabbar pages, C is from A Page opened by the page, for example, page D is opened from page C):
TIP
- navigateTo, redirectTo can only open non-tabBar pages.
- switchTab can only open tabBar pages.
- reLaunch can open any page.
- The tabBar at the bottom of the page is determined by the page, that is, as long as it is defined as a tabBar, there is a tabBar at the bottom.
- The parameters of the call page route can be obtained in the onLoad of the target page.
Modularity
6.1Modularity
can extract some common code into a separate js file. As a module, the module can only expose the interface to the outside through module.exports or exports.
TIP
- exports is a reference tomodule.exports, so changing the direction of exports in the module at will will cause unknown errors. Therefore, it is recommended that developers use module.exports to expose the module interface unless you already know the relationship between the two.
- Mini programs currently do not support direct introduction of node_modules. When developers need to use node_modules, it is recommended to copy the relevant code to the directory of the mini program, or use the npm function supported by the mini program.
// common.js
function sayHello(name) {
  console.log(`Hello ${name} !`)
}
function sayGoodbye(name) {
  console.log(`Goodbye ${name} !`)
}

module.exports.sayHello = sayHello
exports.sayGoodbye = sayGoodbye
In the files that need to use these modules, use require to introduce the common code:
var common = require('common.js')
Page({
helloMINA: function() {
  common.sayHello('MINA')
},
goodbyeMINA: function() {
  common.sayGoodbye('MINA')
}
})
6.2File scope
Variables and functions declared in a JavaScript file are only valid in that file; variables and functions with the same name can be declared in different files without affecting each other.
The global application instance can be obtained through the global function getApp. If global data is required, it can be set in App(), such as:
// app.js
App({
  globalData: 1
})// a.js
// The localValue can only be used in file a.js.
var localValue = 'a'
// Get the app instance.
var app = getApp()
// Get the global data and change it.
app.globalData++// a.js
// The localValue can only be used in file a.js.
var localValue = 'a'
// Get the app instance.
var app = getApp()
// Get the global data and change it.
app.globalData++TIP
- It is worth noting that when requiring a module, a relative path needs to be used.
7.API
The mini program development framework provides a rich set of native APIs, which can easily call up the capabilities provided by the mini program SDK, such as obtaining user information, local storage, etc. For detailed introduction, please refer to the
7.1 Event monitoring API
We agree that APIs starting with on are used to monitor whether an event is triggered, such as: wx.onSocketOpen, wx.onCompassChange, etc.
This type of API accepts a callback function as a parameter. When the event is triggered, the callback function will be called and the relevant data will be passed in as a parameter.
Code example:
wx.onCompassChange(function (res) {
  console.log(res.direction)
})
7.2 Synchronous API
We agree that APIs ending with Sync are synchronous APIs, such as wx.setStorageSync, wx.getSystemInfoSync, etc. In addition, there are some other synchronous APIs, such as wx.createWorker, wx.getBackgroundAudioManager, etc. For details, see the description in the API documentation.
The execution result of the synchronous API can be directly obtained through the function return value. If the execution fails, an exception will be thrown.
Code example:
try {
  wx.setStorageSync('key', 'value')
} catch (e) {
  console.error(e)
}
7.3 Asynchronous API
Most APIs are asynchronous APIs, such as wx.request, wx.login, etc. API interfaces usually accept an Object type parameter, which supports specifying the following fields on demand to receive the interface call results:
Object parameter description
Callback function parameters
When calling the success, fail, and complete functions, an Object type parameter will be passed in, which contains the following fields:
Code example:
wx.login({
  success(res) {
    console.log(res.code)
  }
})